
⏬ Download the WRAP® - Intrensic Automated Video Redaction (AVR) Guide
INTRODUCTION
WRAP Intrensic Automated Video Redaction (AVR) module is the next generation, fully-hosted, cloud evidence redaction system. This guide describes how to operate the WRAP Intrensic AVR module.OVERVIEW
Please review the following introductory information before starting any redaction procedures.
Introduction
The Automated Video Redaction (AVR) technology provided by WRAP Intrensic is optimized for body-worn or dashboard camera footage, which faces unique challenges based on movement, poor lighting, and low resolution. The WRAP Intrensic AVR system employs an advanced algorithm to automatically detect and track faces and other identifiers which can then be easily blurred or otherwise redacted. This system can transform a formerly time-intensive task, previously restricted to video specialists, into an automated function that department officers and security professionals can perform themselves.
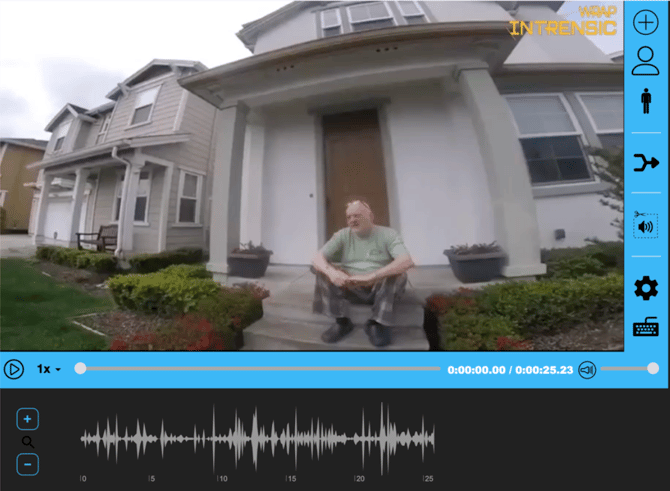
The following image (Figure 1), shows a general example of the Video Redaction window in action.
Figure 1
CONTACT US
If you need assistance or have any questions, contact us by phone at 800-583-2652 or email Support@wrap.com
THE REDACTION PROCESS
This section describes using the redaction tool.
Add and Edit Redaction
How to use add and redact videos.
Adding New Redaction
→ To add a video for redaction:
1. Click the Self Redaction  icon above the BWC Video preview.
2. If this is the first redaction for this video, a prompt window is displayed requesting the following information:
- The Purpose of the redaction (required).
- A Comment (optional).
- A case associated with the redacted video (optional).
3. When you are finished entering the required and optional information, click OK.
4. The Redact video window is displayed (as shown Figure 2).
Note: Depending on the size of the video, the video loading process can take some time. Wait for both video and audio to load before continuing this process.
5. From the right-side toolbar, click the Face  icon to detect faces for redaction (see Figure 2).
Figure 2
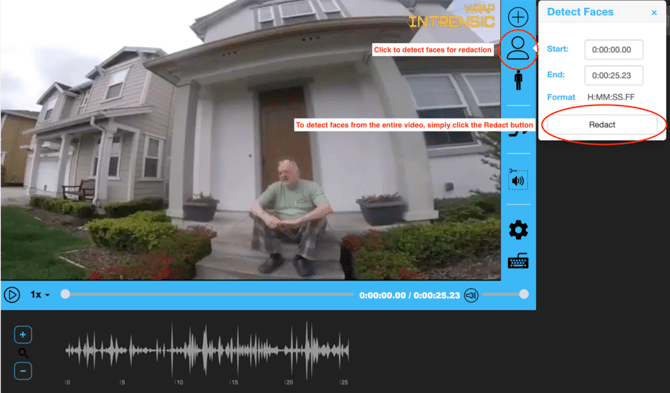
6. The Detect Faces window pops out to the side (as shown Figure 2).
7. Click the Redact button to auto-detect faces from the entire video.
Note: An improved facial detection algorithm allows users to automatically and accurately detect much smaller faces than with previous versions of AVR. This will provide rigorous facial detection from much greater distances.
8. A status bar is displayed as the system searches the video for faces (as shown in Figure 3).
Figure 3
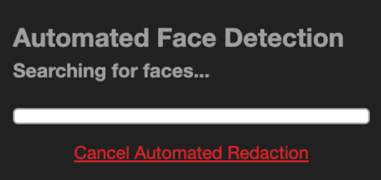
Note: You can cancel the auto-redaction process at any time by pressing the link beneath the status bar.
9. The faces detected (labeled as Person 1 through Person n) are listed along the right side of the Redact video window (as shown in Figure 4).
Figure 4
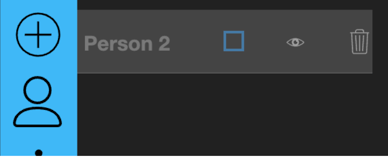
10. Three icons are displayed next to each numbered person in the list, as shown in (Figure 5).
Figure 5
11. These icons represent the following:
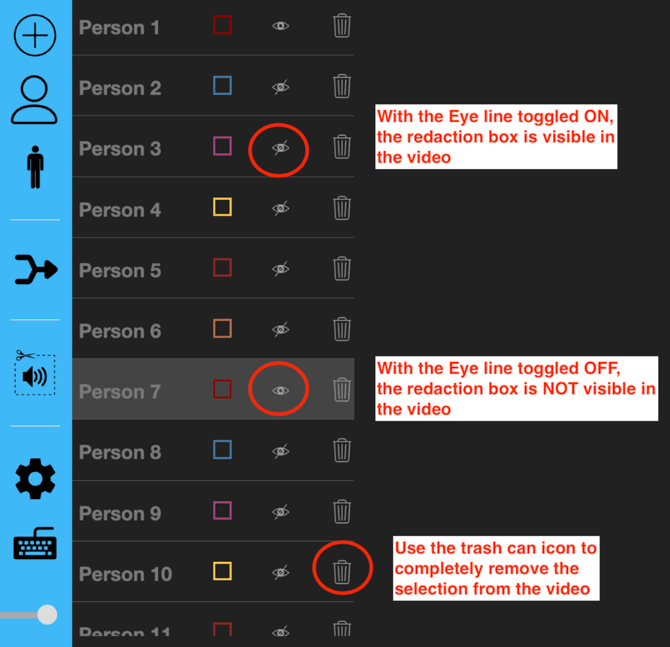
 A Square Box icon, the color of which represents the color of the redaction box used in the video for that person.
 An Eye icon with a line through it. The line is toggled Off/On with a mouse click. When you toggle the line Off, the redaction box is visible in the video. With the line toggled On, the redaction box is not visible in the video.
 A Trash Can icon you can click to completely remove the selected redaction from the video.
Note: Detecting bodies for redaction uses the exact same procedure as that used for detecting faces. Go through the same process as above to redact bodies, except in the step where you selected the Face icon, you'll select the Body  icon instead.
Note that you can use both of these functions within the same video if the video contains both facial and full-body images.
12. Use the normal video player controls to navigate through the video, or use the Keyboard Shortcuts described in Table 1. Alternatively, you can click the Keyboard Shortcut  icon to display a complete list of the shortcuts.
Tip: As examples of using Keyboard Shortcuts, you can Play or Pause the video by pressing the Spacebar, or change the play speed to 2X by simply pressing 4, or change it to 4X by pressing 5. Use the Keyboard Shortcuts to substantially increase the speed and productivity with which you can edit and administer video files.
Preview Video in the Time Bar
The redact video window includes provides a thumbnail preview image from anywhere within the entire video.
To see the thumbnail preview:
1. Float your mouse cursor over the video time line without pressing any mouse buttons.
2. The thumbnail image with its video timestamp is displayed, as shown (Figure 6).
Figure 6
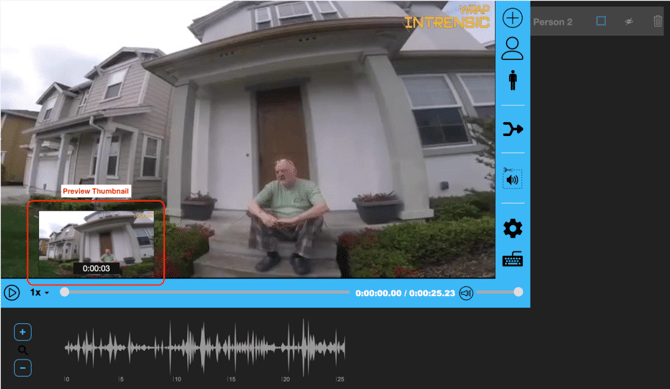
3. When you click the left mouse button, the video moves to the position currently shown in the thumbnail image.
Select a Specific Time Frame for Automated Redaction
Particularly with longer videos, the auto-detection feature can be somewhat time-consuming. Because of this, you may not want to run the automated face or body redaction process on the entire video. To shorten the process, you can select a specific time frame within a video in which to perform automated redaction. You can redact both faces and bodies in this manner.
→ To set up a time frame within a video for automated facial redaction:
1. On the Redact Video window, click the Redact Faces icon. A pop-out menu is displayed, (as shown in Figure 7).
Figure 7
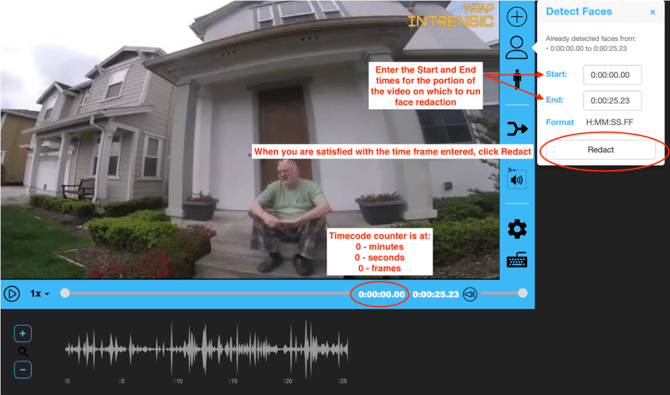
2. In the appropriate fields, enter the Start and End times within the video for the redaction to occur.
3. Click the Redact button when finished.
4. The Status Bar displays the progress while automatic facial redaction is run on the specified time frame.
Note: You can cancel the auto-redaction process at any time by pressing the link beneath the status bar.
→ To redact multiple time frames within the same video:
1. Simply repeat the process described in the previous section on the same video.
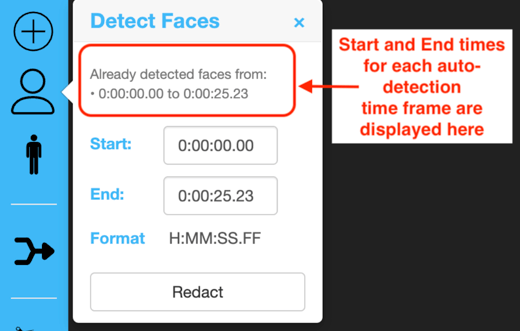
2. Each previous face or body detection time frame is listed above the Start and End fields, (as shown in Figure 8).
Figure 8
Using the Timecode Counter
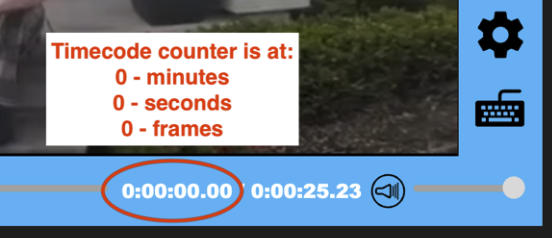
A key feature for editing videos in the redaction video player is the Timecode Counter. Refer to the timecode counter to determine exactly which frame is currently displayed. This can be extremely helpful for determining your precise location within a video.
→ To determine the exact location (by frame) of the currently displayed redaction video:
1. Refer to the video counter beneath the Redact Video window, (as shown in Figure 9).
Figure 9
Adjusting the Playback Speed
From the Redact Video window, you can adjust the speed of the video playback to make the video run faster or slower. This can be helpful when navigating videos to perform redactions. There are 5 different video speeds you can set using the drop-down list directly to the right of the Play  button.
→ To adjust the playback speed:
1. On the Redact Video window, click the 1x indicator next to the Play button. A drop-down list is displayed, (as shown in Figure 10):
Figure 10
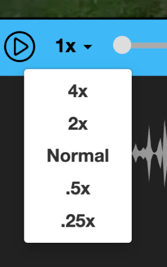
2. Select Normal for 1x speed, 2x for two-times speed, 4x for four-times speed, .5x for half-speed, and .25x for one-quarter speed.
Note: Alternatively, you can use the (1-5), keyboard shortcuts to adjust the playback speed, (as described in Table 1).
Adjusting Automated Redaction
The following adjustments are available to the redaction box:
- Use the mouse controls to adjust the redaction box size and/or location in the video. To adjust the size, hover near the outside of the box until the double-sided arrow appears. Use the arrow to resize the box.
- To move the box, click and hold inside the box, and then move the box to the desired location.
- Since each redaction box adjusts for one frame only, you may need to adjust the size and position of the box numerous times throughout the video as the action progresses.
Tip: Remember, the Keyboard Shortcuts () can also be very helpful in making incremental movements through the video.
Redacting Multiple Faces
Using the automated facial redaction with multiple faces:
The Automated Facial Redaction should recognize multiple people and assign each individual person their own number and color. If this does not happen, refer to the instructions in the "Adding Manual Redaction" section of this document.
The Automated Facial Redaction process redacts all faces in the video.
→ To remove the redaction from a particular face:
1. Click the Trashcan  icon, as shown in Figure 15.
→ To deselect a particular redacted face (show with no redaction):
1. Click the Eye  icon next to that person's designated number to toggle the line On or Off, (as shown in Figure 11).
Figure 11
Note: Depending on the length of the video, the Automated Facial Redaction process can sometimes take several minutes. You can cancel the Automated Facial Redaction process at any time during the redaction.
Merging Redaction Paths
If the program detects multiple faces when it is visibly clear that the detected faces are actually images of the same person, you can combine images into the same redaction path.
To combine images into the same redaction path:
1. From the toolbar on the right side of the Redact Video window, click the Merge Redaction Paths  icon.
icon.
2. In the popup window (as shown in Figure 12), select the paths to be merged by checking all the boxes you want to merge into a single path.
Figure 12
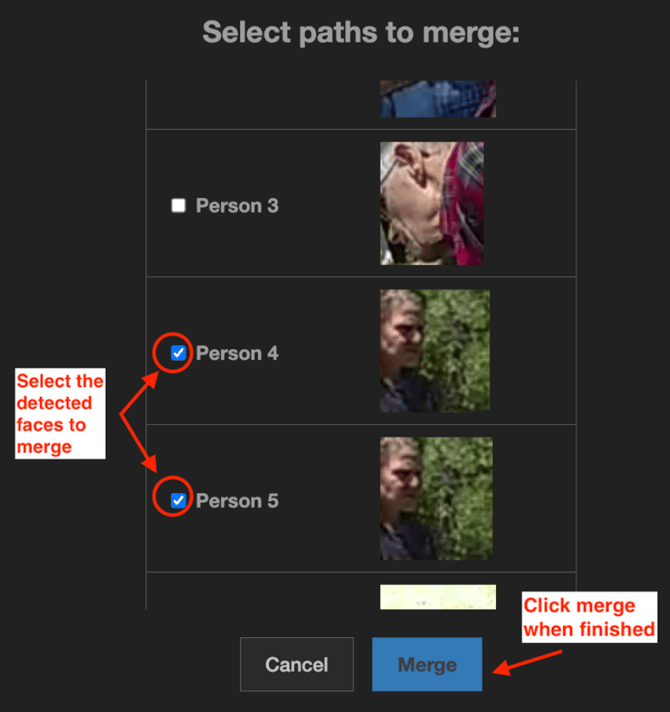
3. Click the Merge button at the bottom of the window. The redactions you selected are combined.
Adding Manual Redaction
→ To manually redact a person or object that automated redaction missed:
1. Click the Add Manual Redaction Object  icon, located in the right-side toolbar of the Redact Video window.
2. A crosshair is displayed in the Video window.
Note: Alternatively, you can press the R key on your keyboard to start manual redaction. Press Esc to exit manual redaction. Refer to the "Keyboard Shortcuts" section Table 1, for several time-saving shortcuts.
3. Use the mouse to click and hold on the center of the crosshair and move it across the Redact video window to form a box over the person or object you want to redact.
4. When you release the mouse button, the redaction is complete.
5. Once you create the box, use the mouse to move or resize the box as needed.
6. Move throughout the remaining video, adjusting the box to follow the object you are redacting.
Tip: Using the keyboard shortcuts, you can quickly jump forward or backward in time to adjust the redaction box as necessary. For example, pressing the F key moves the video 1 frame forward, while pressing the D key moves the video 1 frame backward. Refer to the "Keyboard Shortcuts" section at the end of this document for several time-saving shortcuts.
Cancelling Manual Redaction Function with "Esc" Key
A special feature is included in the Redact Video window for cancelling manual redaction. You can cancel manual redaction at any time using the Esc key.
→ To cancel manual redaction:
1. After selecting manual redaction from the Redact Video window, press the Esc key (see previous image). The manual redaction process is cancelled and the last redaction box added is removed.
Changing the Transparency of Redaction Boxes
This feature allows users to adjust the transparency of the boxes used to set up video redaction. Redaction Transparency settings are applied only during the editing of a video and will not have any effect on the finished redaction.
→ To adjust the transparency of redaction boxes:
1. From the Redact Video screen, click on the Settings  icon. The Settings window is displayed, (as shown in Figure 13).
Figure 13
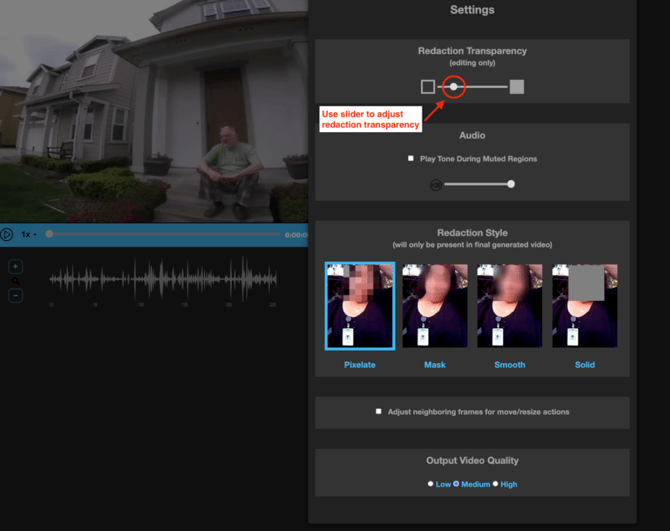
2. Move the Redaction Transparency slider right or left to adjust the transparency of redaction boxes during the editing process.
3. Close the window to activate the selected adjustment.
Redacting Audio
There are no methods for automatically redacting audio from a video. You must use the tools to perform audio redaction manually.
→ To redact audio from a video:
1. Click the Redact Audio Segment  icon.
icon.
2. Using the mouse, click and hold to highlight the area to be redacted. This process is illustrated in Figure 14.
3. The audio feed is synchronized with the video.
Figure 14
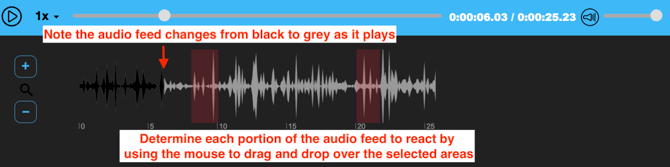
→ To get a closer, more detailed, and accurate look at the audio feed:
1. Use the Zoom  icon, located to the left of the audio display to zoom in an out of the audio display. The plus key (+) zooms in and the minus key (-) zooms back out.
-
Alternatively, if you know the exact time(s) on the video for the audio segments you want to redact, you can use the Redact Audio Segment popup window (see Figure 15) to enter the Start and End times (in mm:ss format) for each redaction.
Figure 15
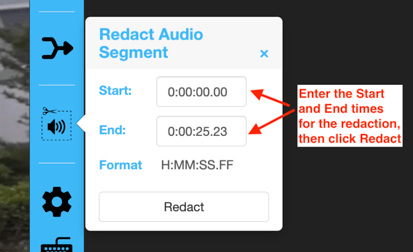
Note: Redacted audio is muted completely for the selected sections unless a beep tone is selected. See "Adding a Beep Tone to Redacted Audio" for details.
Adding a Beep Tone to Redacted Audio
You can also add a beep tone that will play during the redacted audio portions of the video. This can be a useful reminder that audio has been redacted, and that the audio doesn't just go silent at the point where redaction has occurred.
→ To add a beep tone during playback:
1. From the Redact Video window, click the Settings  icon on the right-side toolbar. The Settings window is displayed, (as shown in Figure 16).
Figure 16
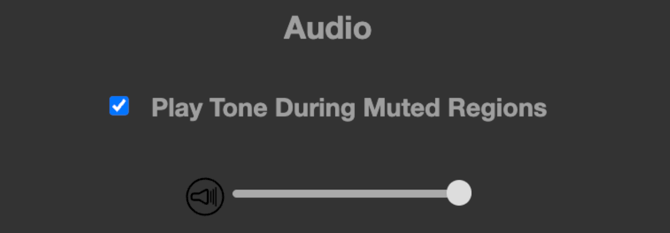 2. Select the Play Tone During Muted Regions check box.
3. Adjust the Volume Slider to control the volume of the redaction beep tone.
Setting Redaction Styles
Four different redaction style options: Pixelate, Mask, Smooth, and Solid are provided.
→ To select a redaction style:
1. From the Redact Video screen, click the Settings icon.
2. The Settings window is displayed
3. Examples of each redaction style are provided in the Settings window, (as shown in Figure 17).
Figure 17
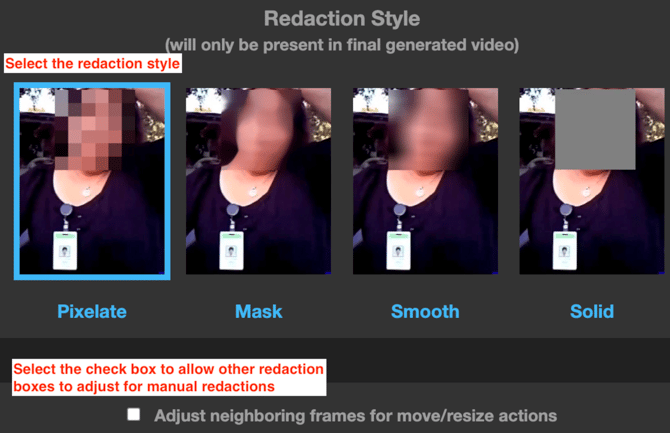
Note: The redaction styles are not visible within the video until after you generate a final video.
4. At the top of the Settings window, select the Adjust neighboring frames for move/resize actions check box to allow the other, previously placed redaction boxes within the video to adjust for the added manual redactions.
Save Redacted Videos
Saving your work with redacted videos.
Saving Videos
You can manually save the video redaction progress as a draft at any time and come back to it later.
Note: The Redaction progress is also automatically saved every 5 seconds to avoid losing any changes.
→ To save the redaction as a draft:
Click the Save Progress button  at the top of the Redact video window.
Generating Videos
→ To save the redaction as a fully-generated redacted video:
1. When you are finished with both video and audio redaction, click the Complete redaction button  at the bottom of the Redact video window.
2. The popup window is displayed (in Figure 18).
3. From this popup, select OK to close.
Figure 18
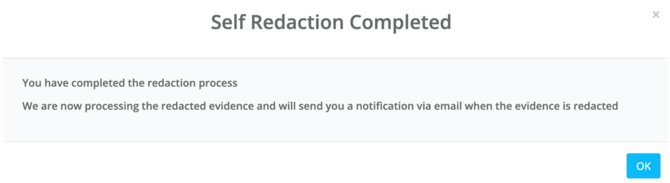
4. When the redaction is complete, you will receive an email from Intrensic <no-reply@intrensic.com> with a link to your redacted video.
KEYBOARD SHORTCUTS
The keyboard can be used to access many of the features of the redaction tool.
Using Keyboard Shortcuts
The available shortcuts are shown in Table 1.
Table 1
|
Key |
Action |
|
1 |
Play video at 0.25x speed |
|
2 |
Play video at 0.5x speed |
|
3 |
Play video at 1x speed |
|
4 |
Play video at 2x speed |
|
5 |
Play video at 4x speed |
|
Spacebar |
Play / Pause video |
|
→ |
Move video 5 seconds forward |
|
← |
Move video 5 seconds backwards |
|
Shift → |
Move video 15 seconds forward |
|
Shift → |
Move video 15 seconds backwards |
|
D |
Move video 1 frame backward |
|
Shift + D |
Move 5 video frames backward |
|
F |
Move video 1 frame forward |
|
Shift + F |
Move 5 video frames forward |
|
G |
Play video for 0.5 seconds, then pause |
|
H |
Play video for 1 second, then pause |
|
J |
Play video for 3 seconds, then pause |
|
K |
Play video for 5 seconds, then pause |
|
V |
Rewind video 0.5 seconds, then play at quarter speed |
|
B |
Rewind video 1 second, then play at quarter speed |
|
N |
Rewind video 3 seconds, then play at quarter speed |
|
M |
Rewind video 5 seconds, then play at quarter speed |
|
R |
Add manual redaction object, switch to manual redaction |
|
Esc |
Exit manual redaction |